UIS – University Information System
Download the defect-free clone 1.7.2 . Experiment with the defect-free clone. Experiment with one of defect clone and read details about it.
UIS is a complex three-layered web with ORM layer that simulates the behavior of a real university information system.
The UIS domain should be easily understandable for any user familiar with the system of university education. This was one of the reasons for choosing this type of domain.
This application serves to verify the accuracy and quality of test methods as SUT (System Under Test). The application may be composed of several sub-entities that may have either a correct (flawless) function or a malfunction. A tester’s task is to consistently test the application and find all the defects.
Technological remarks
UIS is a robust web application created in Java programming language using JavaServer Pages and Spring. The UIS uses Apache Tomcat, MySQL DB (Maria-DB) and Hibernate ORM. The reason why a web application was chosen was practical—it is relatively easy to write automated functional tests using Selenium WebDriver for these types of applications.
In the UIS application was calculatedly with all common (basic) types of control web elements (e.g. menus, buttons, check boxes, selections, modal windows, etc.). Each element (including rows in tables) has its own unique ID (list of all IDs). And where convenient, elements have tooltips.
Application’s parts
The application simulates a university information portal. UIS is composed of three parts. The first part, which is accessible for an unlogged user, can be used for basic maintenance of DB of the system and for getting information about the system settings. The second part is for a student user, while the third part for a teacher user - both will be described later.

UIS menu
The application is preset with semi realistic data (default settings). These data are carefully selected to cover almost all possibilities of different setting, so the user can immediately experiment with the application. These data can be exported into XML or JSON format respectively. If is it necessary to use another setting of DB, user can import DB.
Mainly for testing purposes it is possible to use Restore DB as one of functions of the menu. This activity restores DB with default settings.
The user can obtain useful information about the system at any time by selecting the Home item in the menu, where there are database contents (default settings) and a set of implemented use-cases on the left, and three important pieces of information on the right.
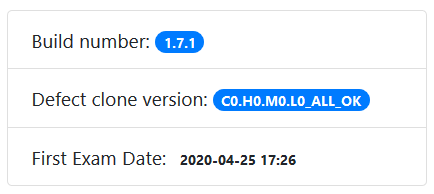
Build number is the version of a base defect-free application.
Defect clone version is a description of a clone of the application and consists of two parts. The left part is composed from letters C (Critical severity), H (High), M (Medium) and L (Low) followed by numbers which are numbers of individual injected defects in each category. Defect-free application has label C0.H0.M0.L0 whereas defect-clone can have e.g. C0.H3.M1.L4 which means “zero critical defect, three defects with high severity, one medium defect and four low defects”. This part is prepared automatically by Error-Seeder application. The right part of the description is a “proper name” of this clone done by the author of the defect-clone. In the case of defect-free application we can see an “ALL_OK” name.
First Exam Date: One of the settings that the application uses. This information is an example of information that is vital for students and teachers and is calculated based on strict rules and important for other features of the application. After the start or restart of the application and after each DB restore, an exam date is calculated. The date and time are always set 24 hours after actual time so the application uses a realistic time.
The second (student’s) and third (teacher’s) parts are described below.
Types of users
There are two basic types of users in this application that can log into the application and use its functions. The first type of user represents a university student and the second type of user is a teacher.
Moreover, there is one other type of user - an unlogged user, but this type has very limited possibilities.
Unlogged user represents a user who is not logged into the system but can use basic functions described above.
Logging
Users can log into the application using a single sign-in form, accessible to all system users. After a successful login, the user is authorized and redirected to the appropriate application view. Student and Teacher have access to different parts of the system. The descriptions of use-cases can be found below.
Number of users cannot be changed after logging, e.g. preset students and/or teachers cannot end their participation. There is only one possibility how to add or remove students, teachers (and subjects too)—to restart the application by using Export/Import DB (described above).
Student
Represents a user who wants to use UIS from the perspective of a university student. He / she can enroll in or unenroll from studied subjects and register for or unregister from a date of an examination of the enrolled subjects.
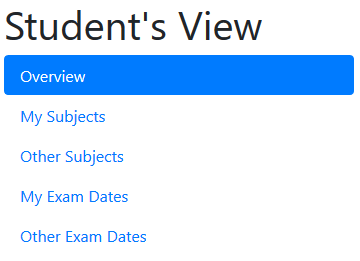
UIS students view
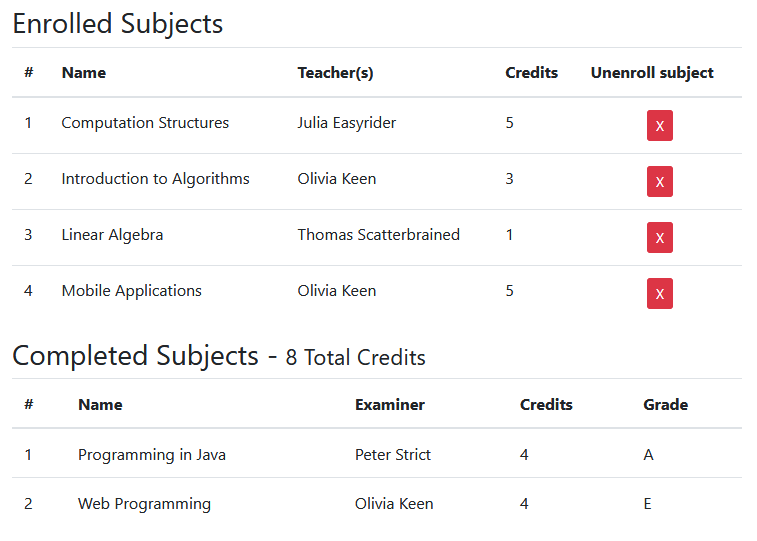
UIS students enrolled and completed sujects
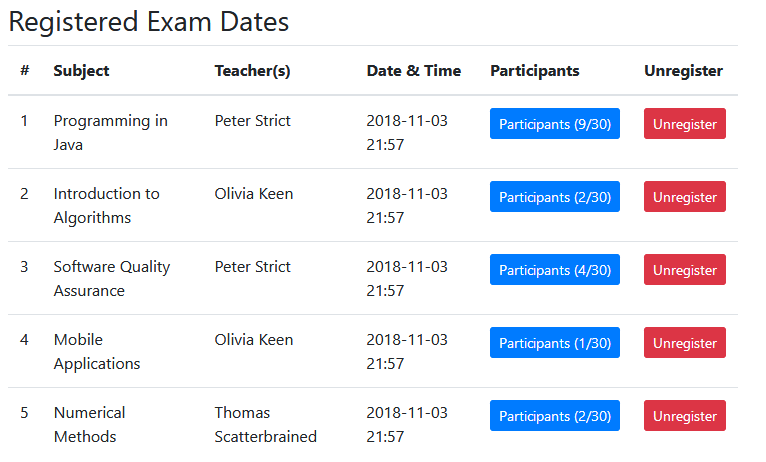
UIS students registered exam dates
Teacher
Represents a user who wants to use UIS from a university teacher’s point of view. The teacher can register and unregister the taught subjects and create and cancel exam dates. The teacher can also evaluate (mark) students participating in the exam date which the teacher has created.
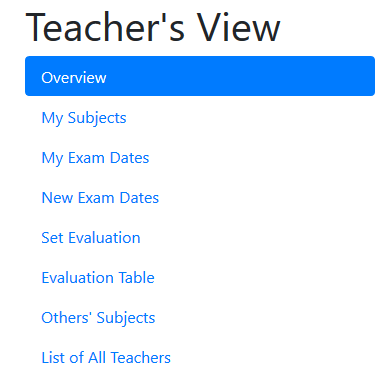
UIS teachers view
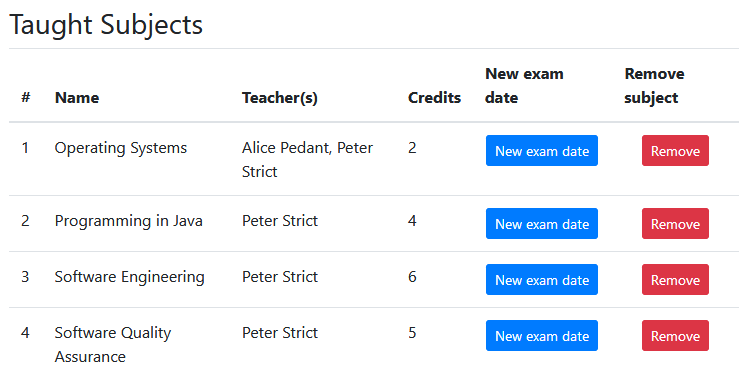
UIS teachers taught subjects
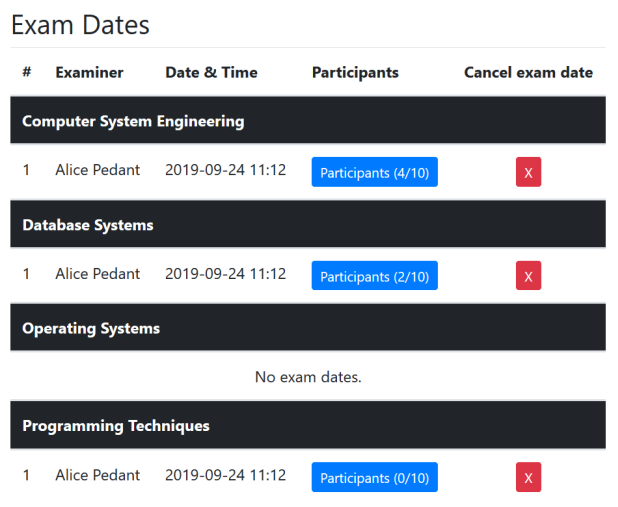
UIS teachers exam dates
Use-cases
| Actor: Unlogged user | ||
|---|---|---|
| ID | Name of UC | Context of Use |
| UC.01 | Application login | Registered user will log into the application and based on the login name the user will be recognized either as a student or a teacher |
| Actor: General logged user — student or teacher | ||
| ID | Name of UC | Context of Use |
| UC.02 | Application logout | Logged in user is logging out of the Application |
| UC.03 | Change of user's personal data | Logged in user can change his/her first name and/or last name and/or email |
| Actor: Logged users — Student | ||
| ID | Name of UC | Context of Use |
| UC.04 | Cancelling the registration (enrollment) to a subject | Student cancels the registration to a subject he/she previously enrolled |
| UC.05 | Displays subjects with passed examination | Summarized information about all subjects with successful examination and their evaluations |
| UC.06 | Subject enrollment | Student enrolls to one of the so far not enrolled subjects |
| UC.07 | Cancellation of registered exam date | Student unregisters his/her exam date for the selected subject |
| UC.08 | Registration of a new exam date | Student registers a new exam date for the selected subject |
| UC.09 | Displays all examination participants — classmates | Summarized overview of all students registered for the date of an examination for a specific subject ("participants"), i.e. the student's classmates |
| Actor: Logged user — Teacher | ||
| ID | Name of UC | Context of Use |
| UC.10 | Cancellation of registered subject | Teacher cancels a subject he/she teaches |
| UC.11 | Displays students registered in the subject | Summarized list of all students attending the specific subject |
| UC.12 | Cancellation of the exam date | Teacher cancels the exam date for his/her subject |
| UC.13 | Displays all examination participants | An overview of all students registered for the date of an examination for a specific subject ("participants") |
| UC.14 | Announcement of a new exam date | Teacher announces a new exam date for his/her subject |
| UC.15 | Enters the examination evaluation | Teacher enters the examination evaluation of the selected student for the selected exam date he/she teaches |
| UC.16 | Enters or reenters (changes) the evaluation of the examination | Teacher enters an evaluation of an examination of the selected student or changes already entered evaluation |
| UC.17 | Signs up to teach a subject | Teacher begins to teach a certain subject |
| UC.18 | Displays the list of teachers and subjects they teach | Overview of teachers and subjects they teach |
| Actor: Unlogged user — a special activity for testing | ||
| ID | Name of UC | Context of Use |
| UC.19 | Restoration of the database | Unlogged user restores DB's into the default state, usually before proceeding to the tests |
| UC.20 | Displays information about system's abilities | Unlogged user gets information about existing use-cases, contents of databes and restrictions in the UIS |
| UC.21 | Export of the database | Unlogged user saves the current content of the database as an external XML/JSON file |
| UC.22 | Import of the database | Unlogged user rewriters the current content of the database with the content of external XML or JSON file |
Use-case diagram

Complexity of the application
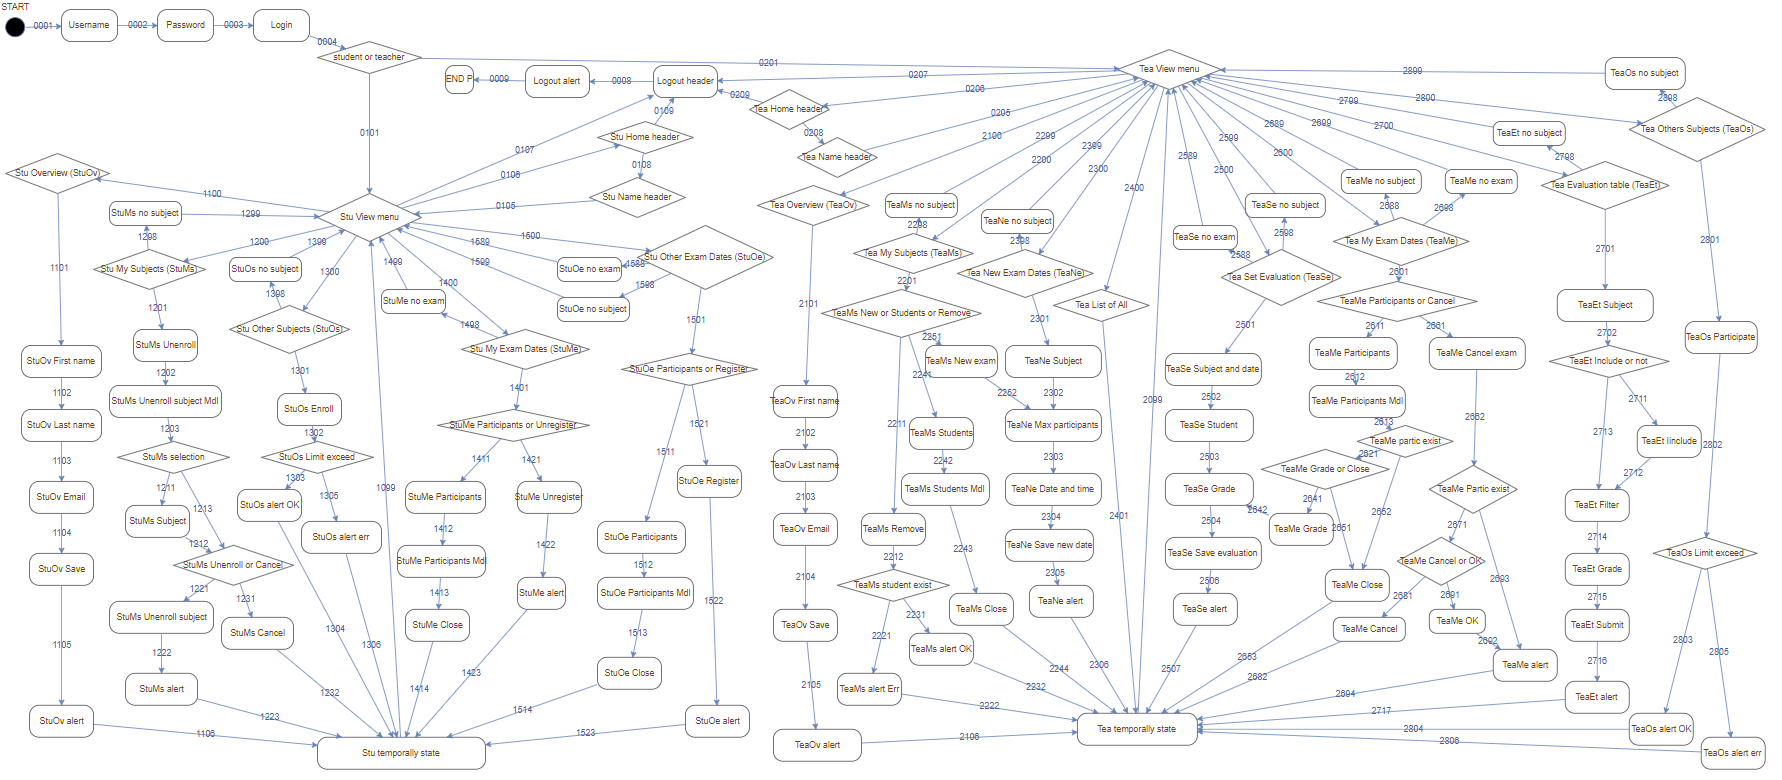
In spite of the fact that the application looks quite simple it has a surprisingly high level of complexity. There are 119 different statuses and 164 possible transitions among them.
This is a state diagram of the student’s and teacher’s parts:
How to run UIS for the first time
Building an application
To build a UIS-web application using Maven to WAR file that can be deployed on a web server with a servlet container (e.g. Tomcat), you can use the following Maven command in the root folder UIS-web project with POM file:
mvn clean install -DskipTests
After a successful build, the resulting WAR file will be located in the target folder. The goal -DskipTests allows skipping tests that could end the assembly process when using beans with a deliberate error.
Deployment of application
If you already have WAR file, you can continue with setting up a database (2. a))
1. a) Running an application using the Maven plugin
The UIS-web application can be started using the Maven tomcat7 plugin, which allows manipulation of WAR projects within the built-in servlet container Tomcat version 7.x. To run a new application using the WAR file with clean assembly the following command can be used :
mvn clean install -DskipTests tomcat7 :run -war
The goal -DskipTests defines a test skip that could end the process assembly with intentionally inserted error version of bean.
1. b)Deploying UIS-Web on Tomcat server
The assembled WAR application can be deployed on a web server Servlet with a container such as Tomcat. War file is on Tomcat server can be deployed in two ways. The first is to insert the created WAR file to a folder with other web applications and run the server (or restart it). Tomcat browses the folder and any new or updated web WAR archives unpack and access the web application. The second option is so-called Hot Deployment, which allows you to deploy a separate web application at runtime server. On Tomcat, you can use Hot Deployment using Tomcat Manager.
2. a) Setting up a database
You must create a new database before running the UIS-Web application for the first time, which the application will use for persistence of data. To use this database UIS-web applications also need to set the user, password, database url (there are also other attributes) for the JDBC database connector in the file (path in WAR file) WEB-INF/classes/META-INF/persistence.xml.
Basic database settings:
| Name of database: | uis-web-db |
|---|---|
| Encoding: | UTF8_general_ci |
| Username: | uis-web |
| Password: | uis |
Warning:
These settings are valid for local instalation only.
Setting up the database in phpMyAdmin
1) Creating a database
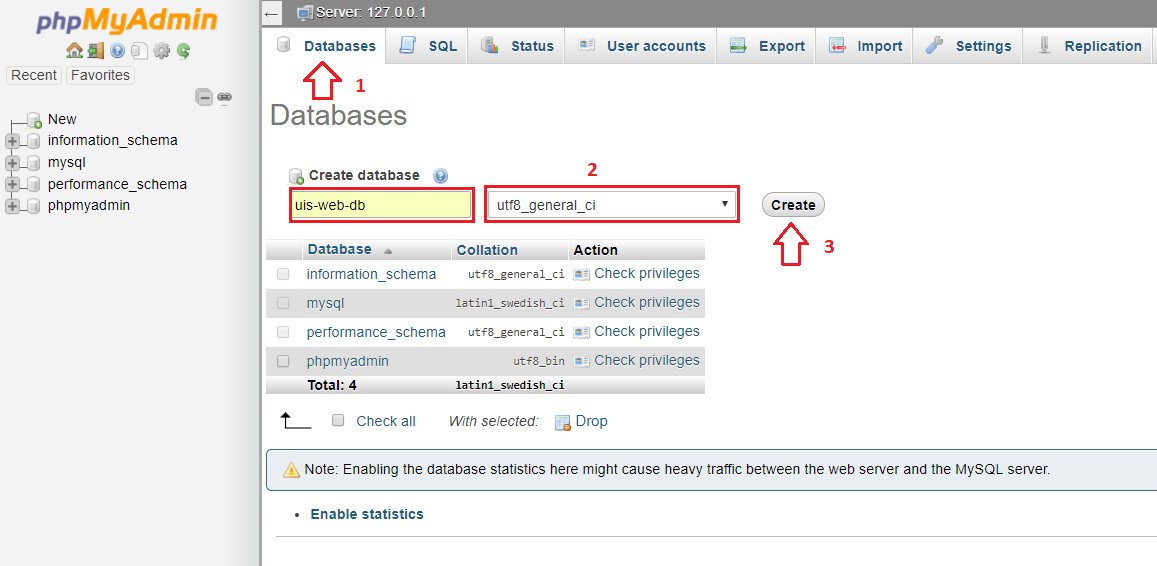
Creating database
2) Creating a uis-web database user
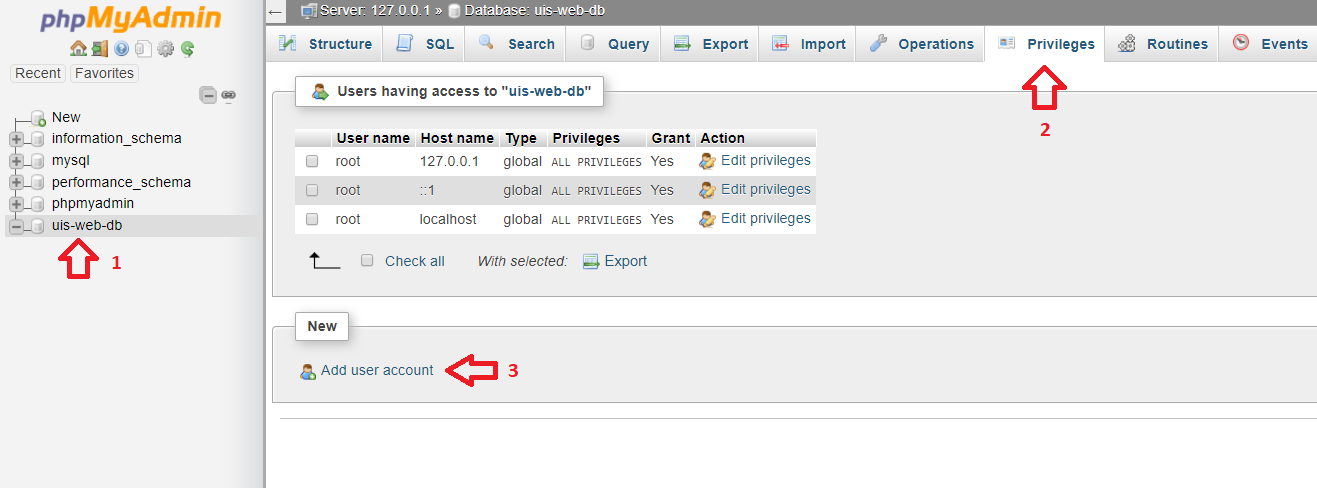
Privileges user account
3) Setting login credentials
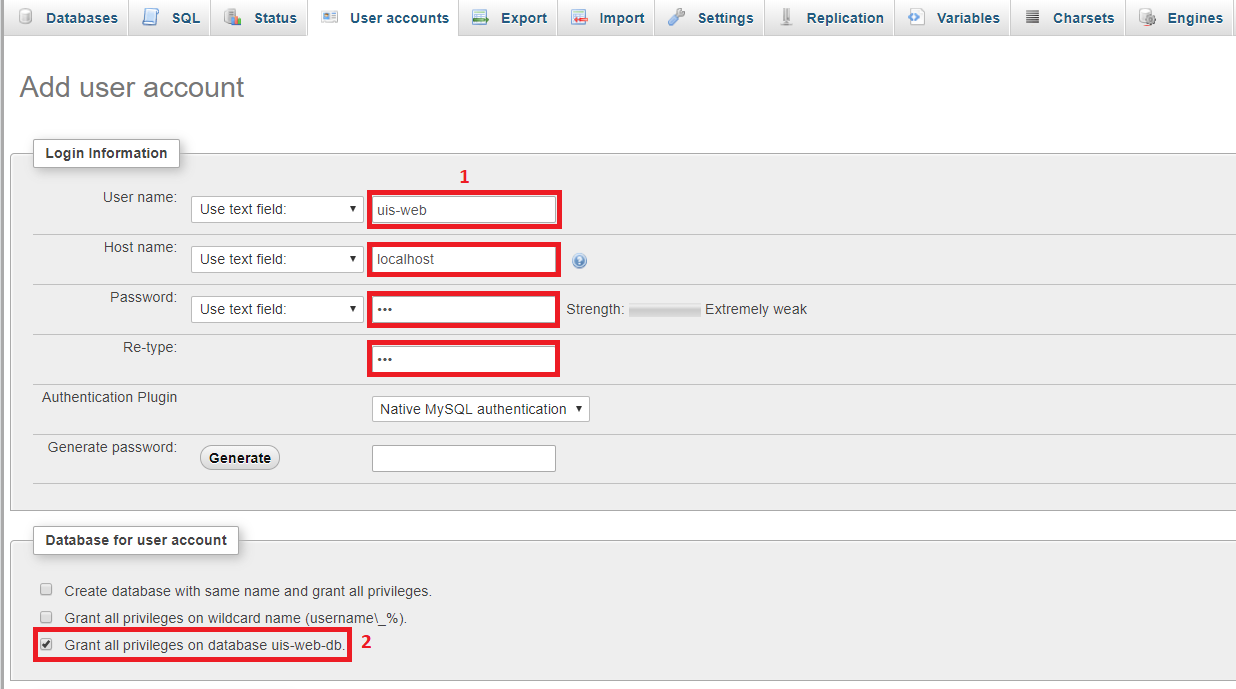
Adding user account
4) Set permissions and save access data
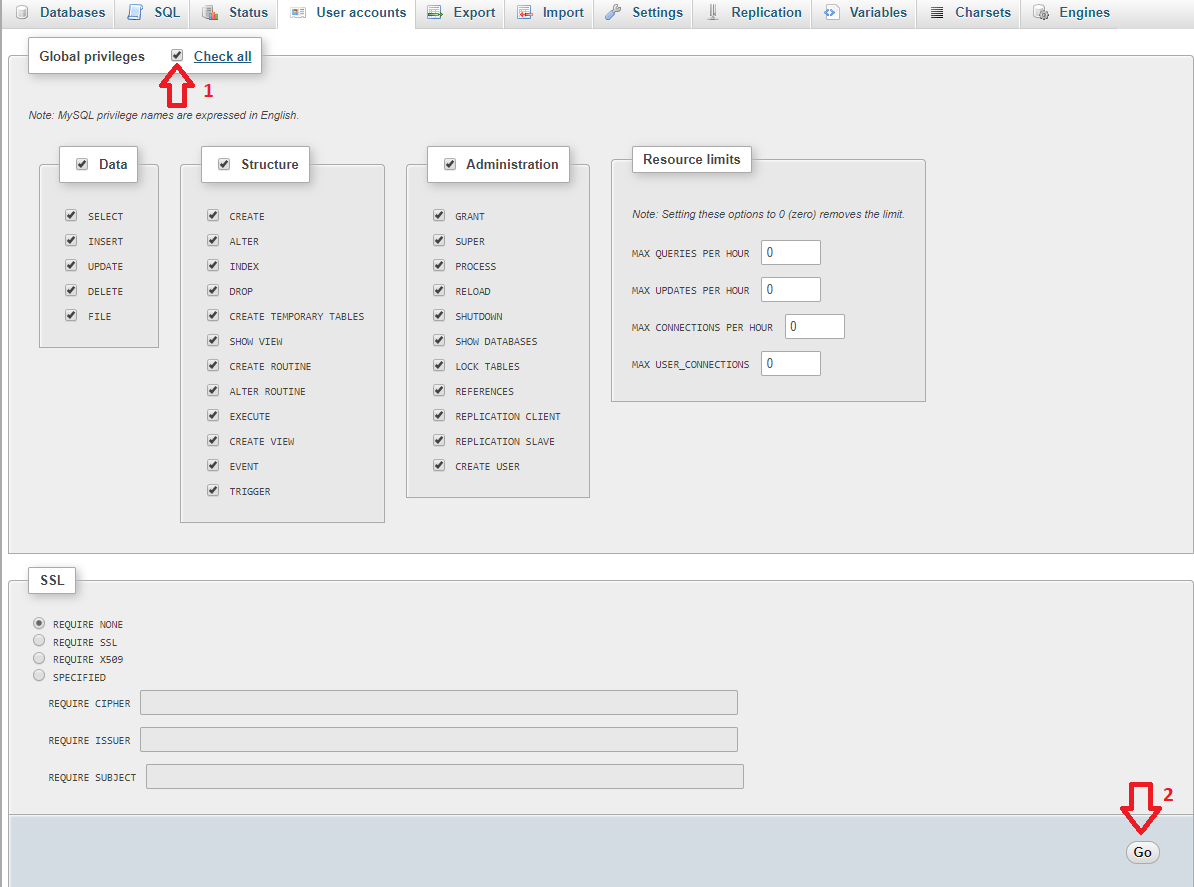
Global privileges user account
Log file
Application creates default log file in runtime folder of program named uis-log.txt. This option can be changed by setting up environment variable named UIS_LOG_FILE. Whenever environment variable UIS_LOG_FILE is set up, application uses the value of this variable as path to log file (including filename). Make sure that folder is created before application starts.
You can verify that the setting is correct using program command set in console. Output should contain line such as:
UIS_LOG_FILE=C:\xxx\log-file-name.txt
ErrorSeeder
Note
At the begining of work with TbUIS you do not need to run ErrorSeeder. It is because 28 defect clones have been already prepared. You will use ErrorSeeder in the case when none of these defect clones fullfils your demands on a sofisticated defect.
Building an application
To build an application, you can use the building tool Maven which will create executable JAR file from the application project with all the necessary dependencies. For this you need to run Maven command in folder, where is POM file located. Command is shown below.
mvn clean install assembly : single
After successful build will be newly created JAR file in the root folder of the project where the POM file is located. After the JAR file will be created in the output folder target.
Prerequisites
For the correct functioning of the ErrorSeeder application, Maven with minimal version 3.0 need to be installed on the PC, where the application is supposed to run. Maven must be also correctly set in the system environment where there must exist a variableJAVA_HOME (with path to used Java) and 3_HOME (with path to installed Maven installation).
Next, catalog with data that will be used by the ErrorSeeder application must be also set. The following sample shows the writing format for each bean and their versions in the catalog. The interfaceName attribute must be unique within the catalog and determines it the name of the interface defining the bean in the UIS. Id version of beans must also be unique in catalog.
<beans>
<bean>
<description>Short bean description</description>
<! -- Interface name in UIS -web -->
<interfaceName>nameOfInterface</interfaceName>
<name> Bean name </name>
<versions>
<version id="1"> <! -- Bean version -->
<name>Bean name</name>
<description>Short bean description</description>
<class>path.to.class.ClassOfBeanVersion</class>
<versionSeverity>CORRECT / LOW / MEDIUM / HIGH / CRITICAL</versionSeverity> <! -- Bean version severity -->
<scenario> <! -- Revealing scenario can be only for error bean versions -->
<step number="1">Step 1</step>
<step number="2">Step 2</step>
...
</scenario>
</version>
<version id="2"> <! -- id must be unique -->
...
</version>
</versions>
</bean>
<bean> <! -- Another bean definition -->
...
</bean>
</beans>
The following sample from the catalog file contains two mandatory elements. These are paths to files in a UIS project. First element specifies the path to the POM file to run the Maven tasks for the project UIS from ErrorSeeder. The second element sets the path to seed.xml file defining which versions of bean will be used in the UIS.
<pathToPOM>path/to/file/pom.xml</pathToPOM>
<pathToBeanSetFile>path/seed.xml</pathToBeanSetFile>
The last example shows the way user template can be created. In the template element, name attribute defining the user template must be filled in. Further, for every template, list of elements with id of beans version that given template contains is stated. For this reason, id attributes of bean versions must be unique. Templates can also be created in ErrorSeeder user interface.
<templates>
<template name=" All_OK ">
<versionId>1</versionId>
<versionId>4</versionId>
<versionId>7</versionId>
<versionId>11 </versionId>
<versionId>13 </versionId>
</template>
</templates>
Use of application
For its functioning, ErrorSeeder uses data from catalog file which is loaded either from directory, from which is the application executed, or by importing catalog file in already running ErrorSeeder application. Data from catalog file must be in correct format. Otherwise they won't pass validation process during their import from file.
Typical use case of ErrorSeeder
- User prepares catalog file named catalog.xml and inserts it do directory with runnable ErrorSeeder JAR file.
- User executes ErrorSeeder. It should automatically load data (beans, bean versions, templates, paths to target ErrorSeeder files) from prepared catalog file. Loaded beans and their versions should be visible on the left side of main view.
- On the left side of main view, user selects bean versions that he or she wants to use in the compiled UIS application.
- After selection of bean versions, user executes injection process of bean versions to UIS application.
- Presence of error versions can user verify by executing Maven task for UIS application test running. User performs this by clicking the Unit Tests button in upper part of panel in the right part of main view.
- Subsequently, user can create WAR file by compiling UIS application with selected bean versions. User performs this creation by clicking the Build button that executes Maven task for UIS compilation.